
There’s a lot to get excited about in mobile application development today. With increasingly sophisticated hardware, tablet PCs and a variety of software platforms (Symbian OS, iOS, WebOS, Windows Phone 7…), the landscape for mobile developers is full of opportunities — and a little complex as well. So much choice can be overwhelming when you just want to get started building mobile applications. Which platform should you choose? What programming language should you learn? What kit do you need for your planned project? In this tutorial, you’ll learn how to start writing applications for Android, the open-source mobile operating system popularized by Google.
There’s a lot to get excited about in mobile application development today. With increasingly sophisticated hardware, tablet PCs and a variety of software platforms (Symbian OS, iOS, WebOS, Windows Phone 7…), the landscape for mobile developers is full of opportunities — and a little complex as well.
So much choice can be overwhelming when you just want to get started building mobile applications. Which platform should you choose? What programming language should you learn? What kit do you need for your planned project? In this tutorial, you’ll learn how to start writing applications for Android, the open-source mobile operating system popularized by Google.
Android is an open-source platform based on the Linux kernel, and is installed on thousands of devices from a wide range of manufacturers. Android exposes your application to all sorts of hardware that you’ll find in modern mobile devices — digital compasses, video cameras, GPS, orientation sensors, and more.
Meet Image Optimization, Addy Osmani’s new practical guide to optimizing and delivering high-quality images on the web. Everything in one single 528-pages book.
Android’s free development tools make it possible for you to start writing software at little or no cost. When you’re ready to show off your application to the world, you can publish it to Google’s Android Market. Publishing to Android Market incurs a one-off registration fee (US $25 at the time of writing) and, unlike Apple’s App Store which famously reviews each submission, makes your application available for customers to download and buy after a quick review process — unless the application is blatantly illegal.
Here are a few other advantages Android offers you as a developer:
Enough with the talk — let’s get started developing for Android!
The recommended environment for developing Android applications is Eclipse with the Android Development Toolkit (ADT) plugin installed. I’ll summarize the process here. If you need more detail, Google’s own developer pages do a good job of explaining the installation and configuration process.
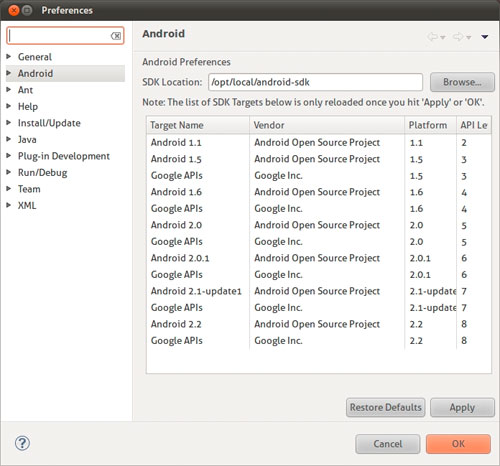
Before you can start writing applications for Android, you need to download the SDK platforms for the Android devices for which you want to develop apps. Each platform has a different version of the Android SDK that may be installed on users’ devices. For versions of Android 1.5 and above, there are two platforms available: Android Open Source Project and Google.
The Android Open Source Project platforms are open source, but do not include Google’s proprietary extensions such as Google Maps. If you choose not to use the Google APIs, Google’s mapping functionality won’t be available to your application. Unless you have a specific reason not to, I’d recommended you to target one of the Google platforms, as this will allow you to take advantage of Google’s proprietary extensions.

Once everything has been successfully downloaded, you’re ready to start developing for Android.
Eclipse’s New Project Wizard can create a new Android application for you, generating files and code that are ready to run right out of the box. It’s a quick way to see something working, and a good starting point from which to develop your own applications:
Project Name: BrewClock Build Target: Google Inc. 1.6 (Api Level 4) Application Name: BrewClock Package Name: com.example.brewclock Create Activity: BrewClockActivity Min SDK Version: 4 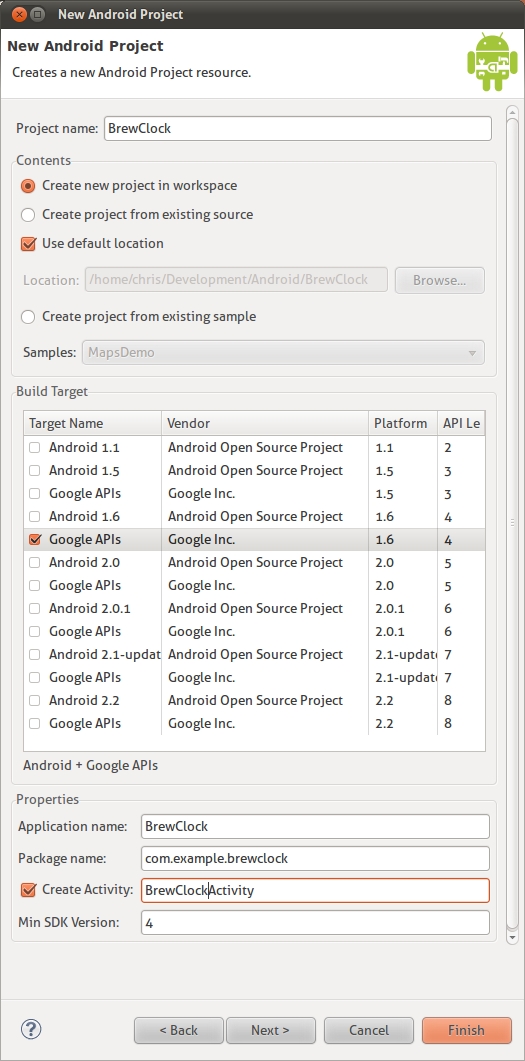
After clicking Finish, Eclipse will create a new Android project that’s ready to run. Notice you told Eclipse to generate an Activity called BrewClockActivity ? This is the code that Android actually uses to run your application. The generated code will display a simple ‘Hello World’ style message when the application runs.
The package name is an identifier for your application. When the time comes and you are willing to publish on Android Market, it’s exactly this identifier that will be used to track your application for updates, so it’s important to make sure it’s unique. Although we’re using the com.example.brewclock namespace here, for a real application it’s best to choose something like com.yourcompanyname.yourapplication .
The Min SDK Version is the earliest version of Android on which your application will run. With each new release of Android, the SDK adds and changes methods. By choosing an SDK version, Android (and the Android Market) knows that your application will only run on devices with a version of Android later or equal than the specified version.
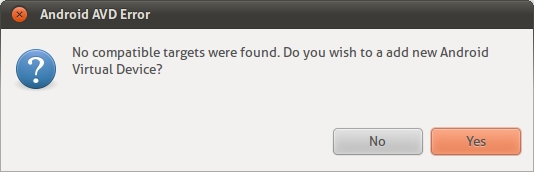
Now let’s try running the application in Eclipse. As this is the first run, Eclipse will ask what type of project you are working on:
Eclipse will now try to run the application on an Android device. At the moment, though, you don’t have any Android devices running, so the run will fail and you’ll be asked to create a new Android Virtual Device (AVD).
An Android Virtual Device (AVD) is an emulator that simulates a real-world Android device, such as a mobile phone or Tablet PC. You can use AVDs to test how your application performs on a wide variety of Android devices, without having to buy every gadget on the market.
You can create as many AVDs as you like, each set up with different versions of the Android Platform. For each AVD you create, you can configure various hardware properties such as whether it has a physical keyboard, GPS support, the camera resolution, and so on.
Before you can run your application, you need to create your first AVD running the target SDK platform (Google APIs 1.6).
Let’s do that now:
Name: Android_1.6 Target: Google APIs (Google Inc.) - API Level 4 SD Card Size: 16 MiB Skin Built In: Default (HVGA) 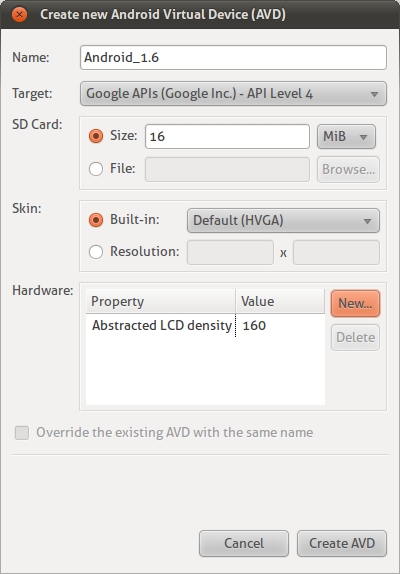
Try running your application again (Ctrl+F11). Eclipse will now build your project and launch the new AVD. Remember, the AVD emulates a complete Android system, so you’ll even need to sit through the slow boot process just like a real device. For this reason, once the AVD is up and running, it’s best not to close it down until you’ve finished developing for the day.
When the emulator has booted, Eclipse automatically installs and runs your application:
Testing generated code is all well and good, but you want to start building a real application. For this, we’ll step through a simple design process and build an application that you can deploy to your Android device.
Most developers (myself included) like a constant supply of good tea or coffee. In the next section of this article you’ll build a simple tea counter application to track how many cups of tea (brews) the user has drunk, and let them set a timer for brewing each cup.
You can download the complete code for this tutorial on GitHub.
One of the first steps to building any Android application is to design and build the user interface. Here’s a quick sketch of how the application’s interface will look:
The user will be able to set a brew time in minutes using the + and - buttons. When they click Start, a countdown will start for the specified number of minutes. Unless the user cancels the brew by tapping the button again, the brew count will be increased when the countdown timer reaches 0.
Android user interfaces, or layouts, which are described in XML documents, can be found in the res/layouts folder. The template code that Eclipse generated already has a simple layout declared in res/layouts/main.xml which you may have seen previously while the application was running on the emulator.
Eclipse has a graphical layout designer that lets you build the interface by ‘dragging’ and ‘dropping’ controls around the screen. However, I often find it easier to write the interface in XML and use the graphical layout to preview the results.
Let’s do this now by changing main.xml to match the design sketch above:
Now change the content of main.xml to:
As you can see, Android’s XML layout files are verbose, but allow you to control virtually every aspect of elements on the screen.
One of the most important interface elements in Android are Layout containers, such as the LinearLayout used in this example. These elements are invisible to the user but act as layout containers for other elements such as Buttons and TextViews .
There are several types of layout views, each of which is used to build different types of layout. As well as the LinearLayout and AbsoluteLayout , the TableLayout allows the use of complex grid-based interfaces. You can find out more about Layouts in the Common Layout Objects section of the API documents.
After saving your layout, try running your application in the emulator again by pressing Ctrl+F11, or clicking the Run icon in Eclipse. Now instead of the ‘Hello World’ message you saw earlier, you’ll see Android now displays your application’s new interface.
If you click any of the buttons, they’ll highlight as expected, but don’t do anything yet. Let’s remedy that by writing some code behind the interface layout:
Next, we’ll change the call to onCreate . This is the method that gets called whenever Android starts your application. In the code that Eclipse generated, onCreate sets the activity’s view to be R.layout.main . It’s that line of code that tells Android to decode our layout XML document and display it to the user.
In Android, R is a special object that is automatically generated to allow access to your project’s resources (layouts, strings, menus, icons…) from within the code. Each resource is given an id . In the layout file above, these are the @+id XML attributes. We’ll use those attributes to connect the Buttons and TextViews in our layout to the code:
In order to detect when the user taps one of our buttons, we need to implement a listener. You may be familiar with listeners or callbacks from other event-driven platforms, such as Javascript/jQuery events or Rails’ callbacks.
Android provides a similar mechanism by providing Listener interfaces, such as OnClickListener , that define methods to be triggered when an event occurs. Implementing the OnClickListener interface will notify your application when the user taps the screen, and on which button they tapped. You also need to tell each button about the ClickListener so that it knows which listener to notify:
. public void onClick(View v) < // TODO: Add code to handle button taps >>
Next we’ll add code that handles each of our button presses. We’ll also add four new properties to the Activity that will let the user set and track the brewing time, how many brews have been made, and whether the timer is currently running.
Notice we’re using the CountDownTimer class provided by Android. This lets you easily create and start a simple countdown, and be notified at regular intervals whilst the countdown is running. You’ll use this in the startBrew method below.
The following methods are all model logic that handles setting the brew time, starting and stopping the brew and maintaining a count of brews made. We’ll also initialize the brewTime and brewCount properties in onCreate .
It would be good practice to move this code to a separate model class, but for simplicity we’ll add the code to our BrewClockActivity :
/** * Set an absolute value for the number of minutes to brew. * Has no effect if a brew is currently running. * @param minutes The number of minutes to brew. */ public void setBrewTime(int minutes) < if(isBrewing) return; brewTime = minutes; if(brewTime < 1) brewTime = 1; brewTimeLabel.setText(String.valueOf(brewTime) + "m"); >/** * Set the number of brews that have been made, and update * the interface. * @param count The new number of brews */ public void setBrewCount(int count) < brewCount = count; brewCountLabel.setText(String.valueOf(brewCount)); >/** * Start the brew timer */ public void startBrew() < // Create a new CountDownTimer to track the brew time brewCountDownTimer = new CountDownTimer(brewTime * 60 * 1000, 1000) < @Override public void onTick(long millisUntilFinished) < brewTimeLabel.setText(String.valueOf(millisUntilFinished / 1000) + "s"); >@Override public void onFinish() < isBrewing = false; setBrewCount(brewCount + 1); brewTimeLabel.setText("Brew Up!"); startBrew.setText("Start"); >>; brewCountDownTimer.start(); startBrew.setText("Stop"); isBrewing = true; > /** * Stop the brew timer */ public void stopBrew() < if(brewCountDownTimer != null) brewCountDownTimer.cancel(); isBrewing = false; startBrew.setText("Start"); >. >
The only parts of this code specific to Android are setting the display labels using the setText method. In startBrew , we create and start a CountDownTimer to start counting down every second until a brew is finished. Notice that we define CountDownTimer’s listeners ( onTick and onFinish ) inline. onTick will be called every 1000 milliseconds (1 second) the timer counts down, whilst onFinish is called when the timer reaches zero.
To keep this tutorial code simple, I’ve intentionally written label strings directly in the code (e.g. “Brew Up!” , “Start” , “Stop” ). Generally, this isn’t good practice, as it makes finding and changing those strings harder in large projects.
Android provides a neat way to keep your text strings separate from code with the R object. R lets you define all your application’s strings in an xml file ( res/values/strings.xml ) which you can then access in code by reference. For example:
Brew Up! . # /res/com/example/brewclock/BrewClockActivity.java . brewLabel.setText(R.string.brew_up_label); . Now if you wanted to change Brew Up! to something else, you would only need to change it once in the strings.xml file. Your application starts to span dozens of code files which keeps all your strings in one place and makes a lot of sense!
With the code complete, it’s time to try out the application. Hit Run or Ctrl+F11 to start BrewClock in the emulator. All being well, you’ll see the interface set up and ready to time your tea brewing! Try setting different brew times, and pressing Start to watch the countdown.
In this short introduction to Android, you’ve installed the Android SDK and Eclipse Android Development Tools (ADT) plugin. You’ve set up an emulator, or virtual device that can test your applications. You’ve also built a working Android application which has highlighted a number of key concepts that you’ll use when developing your own Android applications.
Hopefully, this has whet your appetite for building mobile applications, and experimenting in this exciting field. Android offers a great way to start writing applications for a range of current and upcoming mobile devices. If you’ve built or are working on your own mobile app, be sure to let us know about it in the comments!